Hitomezashi sashiko: a tutorial

Yesterday I posted the result of my year-long endeavor with hitomezashi, the “one-stitch” style of sashiko done with alternating over-and-under stitches.

hitomezashi by Saké PuppetsToday I thought I’d post a tutorial so you can try this style of sashiko at home. I bought a pre-printed pattern, but once I got going I realized it wasn’t necessary. Hitomezashi is straightforward, with alternating stitches on a grid. Much like knitting, the repeating pattern is easy to memorize and follow.

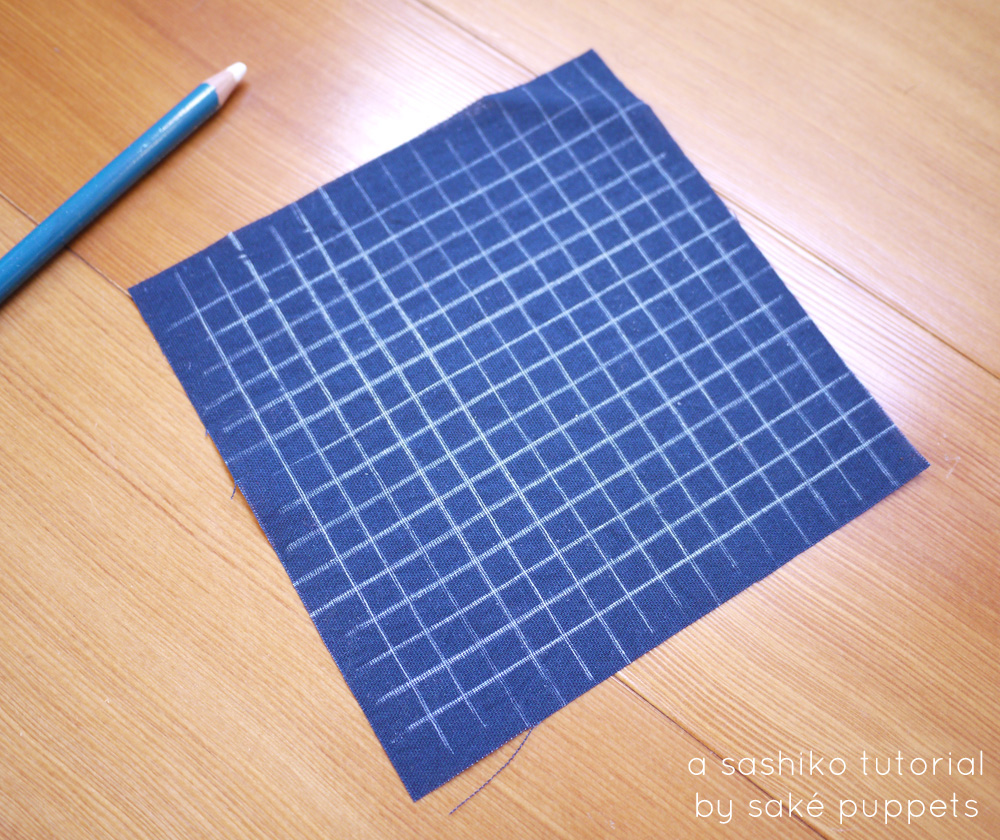
Let’s begin by drawing your grid onto your fabric. I made my lines 1/4″ apart. Draw lightly, you want these to wash out later, but you also don’t want them to wear off too soon.

sashiko tutorial by Saké PuppetsNow you’ll simply follow a pattern, making one stitch per space on the grid.

a sashiko tutorial by Saké Puppets

Stitch all of the horizontal lines first, then proceed to stitch all of the vertical lines. In the end, your pattern will emerge!

a sashiko tutorial by Saké PuppetsI have broken the kaki no hana (persimmon flower) pattern down and isolated just the horizontal and vertical stitch lines in separate graphics. This pattern is done on a repeat, so you can make your project as large (or as tiny!) as you’d like.  The key to remember is that as you work your line, you are always alternating stitches — one up, one down, one up, one down, and so on. If you skip a space on the grid, it will throw your whole pattern off.

Once complete, wash or spray your project with water to remove the grid lines. Hem or use bias tape on the edges for a nice finish.

You can create different designs by changing the patterns on the horizontal or vertical axis. Enjoy! I look forward to seeing your masterpieces!

step 1: horizontal linesstep 2: vertical linesVoila! the pattern emerges! A sashiko tutorial by Saké Puppets

&Stitches e-zine (and giveaway!)

Update: We’re no longer accepting entries for this giveaway. Winners will be announced later today. Thanks!

* * *

Recently the quarterly e-zine &Stitches asked me to contribute to their Asia-inspired issue, and I happily accepted! I provided a short background and tutorial on my favorite Japanese craft, sashiko.

&Stitches is a digital magazine focused on modern embroidery. My sashiko tutorial in this quarter’s issue includes the traditional seigaiha pattern, or blue ocean waves.

The e-zine contains lots of other great stuff too, including embroidery tutorials, patterns, book reviews and interviews, including one by Jenny Hart of Sublime Stitching, whose cheeky patterns helped me rediscover embroidery almost 10 years ago (whoa!). I’ve already devoured the entire issue and enjoyed flipping through the lovely, really colorful photographs. You can check out the &Stitches Facebook page or click on over to their blog to pick up a copy. Use code momiji during check out to receive a 10% discount on your zine purchase, valid through July 7th. Along with the issue you’ll also receive a coupon for free shipping until July 15th on any purchase in my Etsy shop.

But better yet, you can win a free copy! The fine ladies at &Stitches have offered to giveaway two issues to readers of this blog. Leave a comment here before midnight Thursday July 5th Tokyo time, and I’ll use a random number generator to select two lucky readers. Talk about happy stitchin’!

You can also check out the Saké Puppets Facebook page, follow me on Twitter, or peek at my online Etsy shop, where new fabrics and patterns are being updated. Thanks!

P.S. I should note that &Stitches hails from the UK, where the term “oriental” doesn’t have the same connotations as it can in American English. It goes without saying that the &Stitches team is excited about introducing their readers to embroidery styles from around the world.

Kawaii (Cute!) Mushroom Tutorial

More vegetables are popping up…

This was the result of a rainy weekend in Tokyo. What was I supposed to do, study Japanese? Bah!

Some folks expressed interest in making their own veggies, so I thought I’d share a short tutorial. This mushroom pattern is super easy and comes from this book, which is from the Heart Warming Life Series and translates to “Full of Cute Vegetables and Fruits.” As I mentioned in my earlier post, these felt fungi stitch up quickly and are really satisfying to make — they’re maybe even a bit addictive. Consider yourself warned!

Kawaii (Cute!) Mushroom Tutorial

Here we go!

Gather your materials. You’ll need white and dark brown felt, a pair of scissors, a needle, stuffing, and some matching thread. I use embroidery floss because it’s what I have handy, but any thread will work as long as it matches your felt.

Cut out your felt pieces. I like to make a paper pattern first, and then trace around the pattern onto the felt. From the white felt cut out two circle “tops” 35 mm in diameter (1 3/8″), and two “stems” approximately 25 mm (1″) in height. From the brown felt cut one circle 55 mm in diameter (2 1/8″).

Assemble the mushroom. Stitch the two white circles together, sewing 3/4 of the way around the perimeter. Fill your mushroom top with stuffing, and then stitch the circles closed. Repeat this process for the stem, leaving a little tail of excess thread. I recommend using a blanket stitch, because it leaves a nice edge, but use whatever stitch you’re comfortable with.

Next, attach the stem to the top using that extra bit of thread. Make little stitches around the open edge of the stem, securing it to the top until it is nice and stable.

Make the mushroom cap. Stitch along the outside edge of the brown circle using a running stitch.

Now the fun part — gently pull your thread tight , and your mushroom cap should slowly take form…

Slip the assembled mushroom inside the gathered brown felt, placing the mushroom cap on top of the assembled mushroom like a hat. Continue to tighten the brown thread until the mushroom cap hugs evenly around all sides of the mushroom top.

Tie a tight knot and hide the tail of your thread inside. Nice work! Now make a few more, and watch your own garden start to grow. (@⌒ー⌒@)

In the spirit of sharing and caring, please don’t use this pattern for profit, and give credit to the book’s author when credit is due (前田 智美). Thanks! 

On-the-Go Project Pouch Tutorial

I wrote a little how-to for the lovely sewing blog, Sew, Mama, Sew!

It just went live and I’m pretty excited.

So pop over there and check it out!  They also posted a few photos of me — gasp!  I usually like to rock it Wizard of Oz style … “Pay no attention to the man behind the curtain!”  So enjoy it, folks.

Thanks again, Sew, Mama, Sew!  And to those visiting for the first time, いらっしい!Welcome!