Book Review Series: Wrapping with Fabric

Book Review: Wrapping with FabricTuttle Publishing specializes in English-language books on Asia, and has produced some great translated craft books from Japan. Recently they asked if I was interested in looking at a couple. Yes, please!

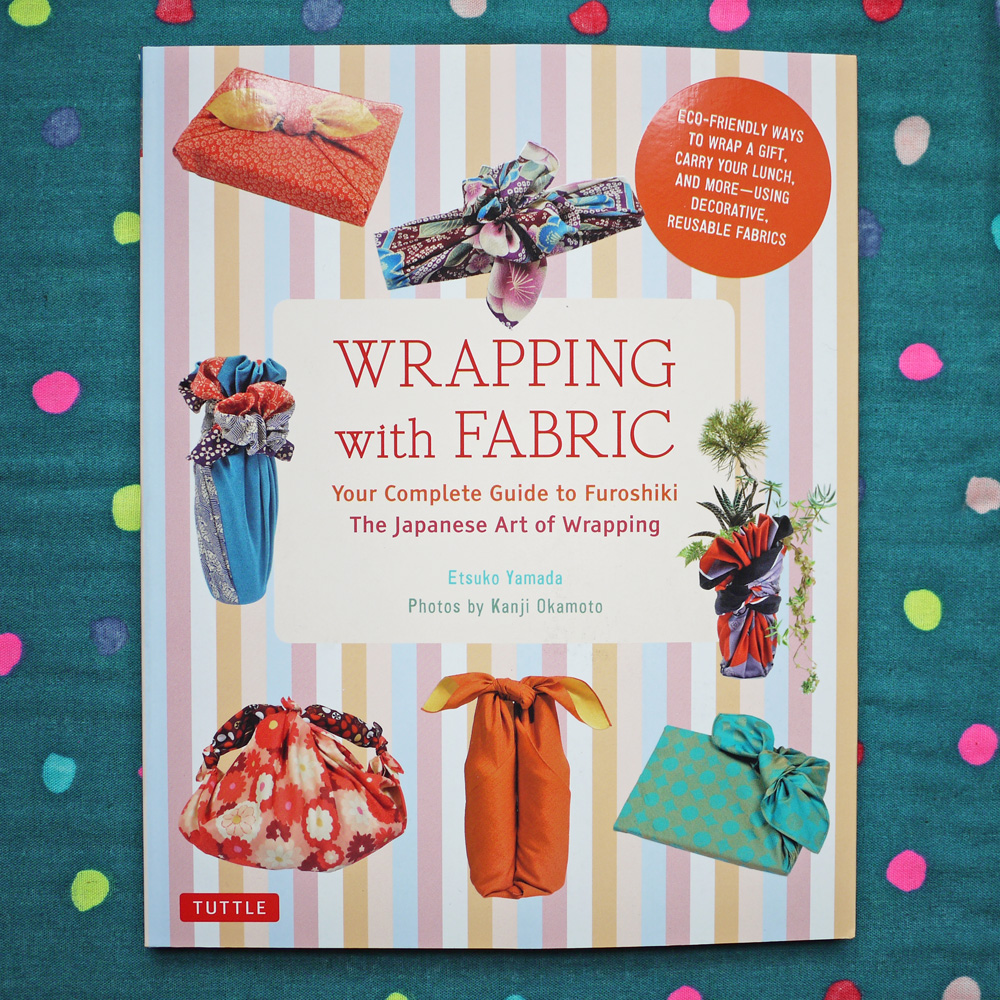
The first is Wrapping with Fabric: Your Complete Guide to Furoshiki, The Japanese Art of Wrapping. This 112-page full color book covers the basics of furoshiki — history, basic knots, gift wrapping and easy carry-all bags — but it goes further with some really imaginative ideas. I’ve picked up my fair share of free furoshiki handouts over the years, and this book provides instructions for wrappings I’ve never before seen: how to carry a yoga mat or wet umbrella, methods for covering a handbag (for protection or ugliness?!), and my personal favorite, the watermelon wrapping:

How to wrap a watermelon, from Wrapping with Fabric, Tuttle Publishing via SakéPuppets.com
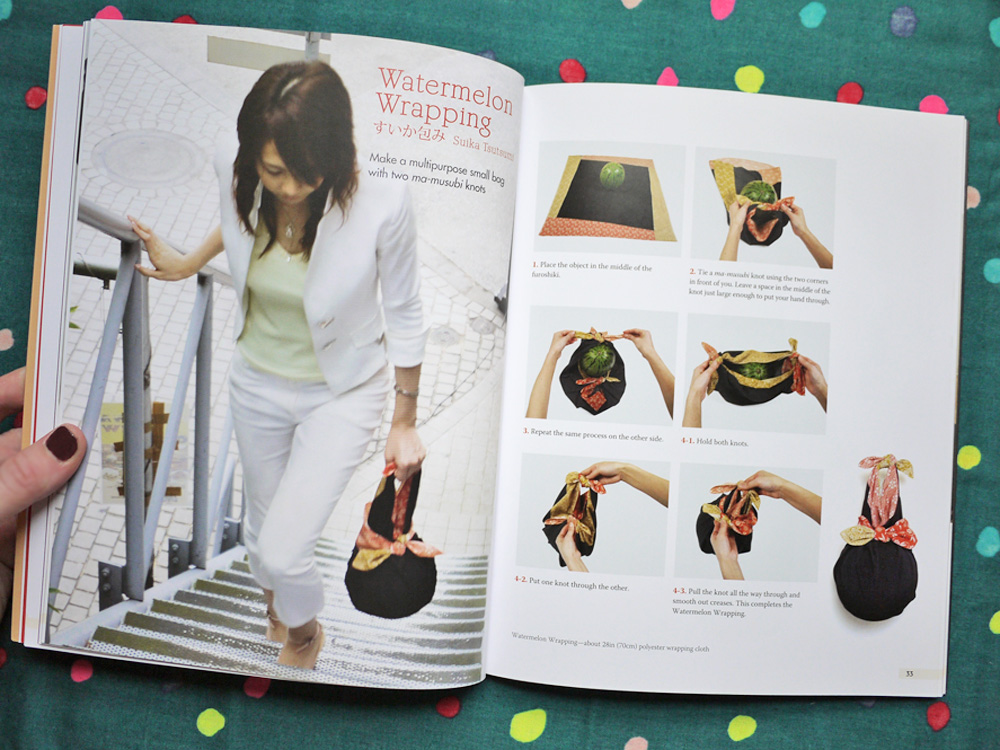
This might be the most Japanese thing I have ever seen. When you pay $100 for a watermelon, you better be sure it’s wrapped, y’all.

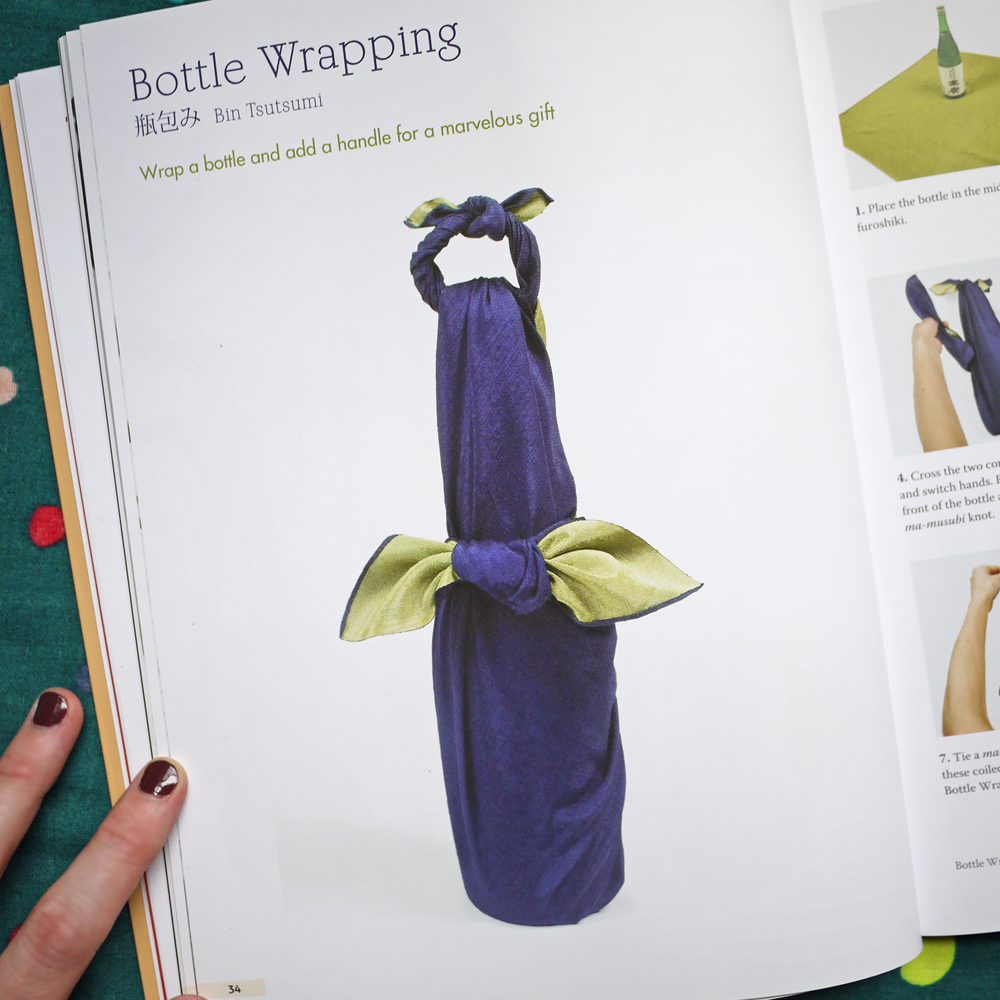
Also, it seems the author and I have a little something else in common:

Wrapping with Fabric, Tuttle Publishing via SakéPuppets.comWrapping with Fabric, Tuttle Publishing via SakéPuppets.comDrinks, drinks, double drinks.

I enjoyed this book a lot, and was eager to give one of the projects a spin. I started with the simple bottle gift wrap — because sometimes I give my hooch away and cheap wine looks much better with a classy wrap. Also, I was worried that my botched first-try wrap-job might send this bottle crashing into the street, so better to start slowly with a singlet.

Wrapping with Fabric, Tuttle Publishing via SakéPuppets.comFuroshiki test, via SakéPuppets.comThe result? Not bad! A little more chaotic than the book promises, but certain to wow any crowd of semi-tipsy pot-luckers.

Wrapping with Fabric, Tuttle Publishing via SakéPuppets.com
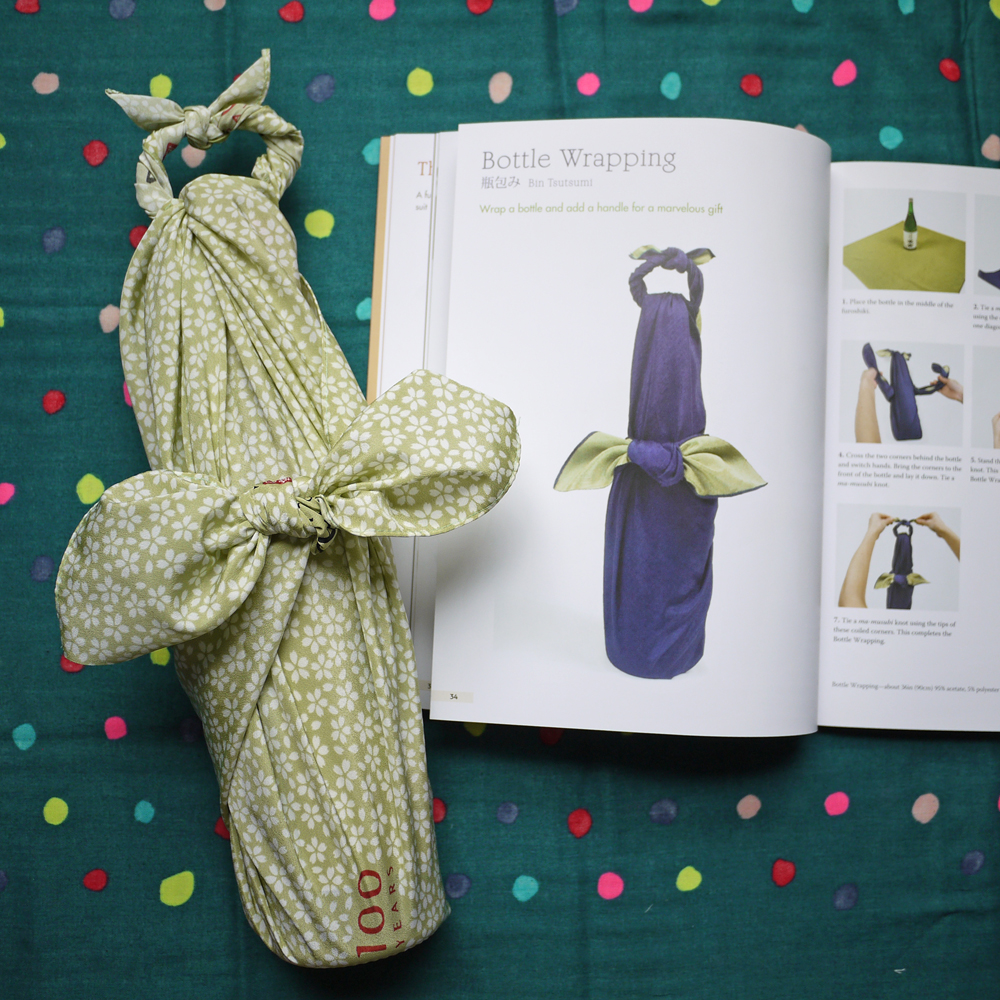
Not surprising, but the key to a successful fabric wrap is all in the fabric. Thankfully this is something the book covers generously. My trusty polyester Japan Society furoshiki was ideal — thin and smooth but not slippery like silk can be. I also appreciated the book’s coverage of wrapping etiquette, tips that would have been useful while living in Japan. Apologies to all those I offended with backward knots.

If you are looking to enhance your furoshiki game, this book is a good choice. Need supplies? I love the designs from Link Collective, who I met at an Etsy event in Tokyo. You can also embroider or sashiko simple cotton fabric using one of my patterns, available for download here.

And lastly, you can find more information about Wrapping with Fabric on Tuttle’s website or on Amazon. Happy wrapping!

Wrapping with Fabric, Tuttle Publishing via SakéPuppets.com

This book was provided by Tuttle Publishing for review, but opinions are all my own. Thanks!

We Are Champions

I buy many Japanese craft and sewing books. They are my guilty pleasure. Besides fabric, parfaits, wedge sandals, cappuccinos, and macarons.

I like to share the projects my craft books inspire, like my mega hair bows, felt veggies, and embroidered badges. Japanese books have excellent illustrations (as do menus and train safety signs), and with my somewhat-functional language skills I can figure things out with little problem. But this book had me stumped.

下田直子の手芸技法 Handcraft Techniques by Naoko Shimoda下田直子の手芸技法 Handcraft Techniques by Naoko Shimoda includes 23 techniques for embroidery and hand sewing. It is a beautiful book with stunning examples of smocking, scalloping, gathering and quilting.

p10-11 下田直子の手芸技法 Handcraft Techniques by Naoko Shimodap38 下田直子の手芸技法 Handcraft Techniques by Naoko Shimodap40-41 下田直子の手芸技法 Handcraft Techniques by Naoko Shimodap57 下田直子の手芸技法 Handcraft Techniques by Naoko Shimodap62-63 下田直子の手芸技法 Handcraft Techniques by Naoko Shimodap64-65 下田直子の手芸技法 Handcraft Techniques by Naoko ShimodaAren’t those textures incredible?! I would love to try these smocking techniques on a dress or blazer someday.

For my first project from this book I thought I’d start with a simple rosette ribbon project inspired by these pages.

p42-43 下田直子の手芸技法 Handcraft Techniques by Naoko Shimodap44-45 下田直子の手芸技法 Handcraft Techniques by Naoko ShimodaThese rosettes seemed like a good beginner project and I dreamed of wearing my ribbon award proudly like a Grand Champion heifer. But I was quickly proven wrong.

p112-113 下田直子の手芸技法 Handcraft Techniques by Naoko ShimodaFor Technique L [Ribbon Work] I was instructed to measure, mark, and pin the ribbon into various folds. My fingers were not nimble and the pins left holes in the ribbon, and my rosette started to resemble an award for Grand Prize Loser.

The project sat on my desk for months, deflated and sad. It wasn’t until thumbing through another craft book about ribbon rosettes that I found a  tip — use a small piece of cardboard to help fold-and-hold the ribbon while you simultaneously tack the bottom edges with needle and thread. Once I got the hang of that, my rosette came together nicely.

Saké Puppets: Grand Champion of Winning!And now I feel like the Grand Champion of Winning.

I’m going to make more of these, since now the only challenge lies in finding interesting ribbons and button centers. Perhaps I’ll present them to my friends and loved ones for tasks I deem prize worthy: 1st Place in Chopping Onions, Grand Prize in Hailing Taxis, and the coveted Mr. Hustle Award.

What awards would you present?

Stitch Lessons

I bought this Japanese craft book a few weeks ago and have thumbed the pages many times, trying to decide which pattern to stitch. They don’t make it easy.

The title translates to “Stitch Lesson: 6 basic stitches for lines and surface embroidery.” The book begins with basic instruction in the Big Six: outline stitch, backstitch, chain stitch, satin stitch, long and short stitch, and the couching stitch. In truth, I could use the help. I lean pretty heavily on the split stitch with a fat ol’ six strands of floss, so I thought this book would provide inspiration for some much-needed practice in the dainty-stitch spectrum.

Each page spread presents one project, the complete design on linen on the left and full-size stitch diagram and detail on the right. Patterns and project instructions are relegated to the back.

It is a beautiful book, but let’s be honest — the real reason I bought it was for the very last pattern:

Mmm, pudding.

I acquired some linen swatches that seemed perfect for dainty pudding stitches, but in truth, am having difficulty transferring the detailed patterns onto these coarser fabrics. So I might switch back to cotton, or maybe I’ll just stop whining. I’ll let you know how it goes!

Kawaii (Cute!) Mushroom Tutorial

More vegetables are popping up…

This was the result of a rainy weekend in Tokyo. What was I supposed to do, study Japanese? Bah!

Some folks expressed interest in making their own veggies, so I thought I’d share a short tutorial. This mushroom pattern is super easy and comes from this book, which is from the Heart Warming Life Series and translates to “Full of Cute Vegetables and Fruits.” As I mentioned in my earlier post, these felt fungi stitch up quickly and are really satisfying to make — they’re maybe even a bit addictive. Consider yourself warned!

Kawaii (Cute!) Mushroom Tutorial

Here we go!

Gather your materials. You’ll need white and dark brown felt, a pair of scissors, a needle, stuffing, and some matching thread. I use embroidery floss because it’s what I have handy, but any thread will work as long as it matches your felt.

Cut out your felt pieces. I like to make a paper pattern first, and then trace around the pattern onto the felt. From the white felt cut out two circle “tops” 35 mm in diameter (1 3/8″), and two “stems” approximately 25 mm (1″) in height. From the brown felt cut one circle 55 mm in diameter (2 1/8″).

Assemble the mushroom. Stitch the two white circles together, sewing 3/4 of the way around the perimeter. Fill your mushroom top with stuffing, and then stitch the circles closed. Repeat this process for the stem, leaving a little tail of excess thread. I recommend using a blanket stitch, because it leaves a nice edge, but use whatever stitch you’re comfortable with.

Next, attach the stem to the top using that extra bit of thread. Make little stitches around the open edge of the stem, securing it to the top until it is nice and stable.

Make the mushroom cap. Stitch along the outside edge of the brown circle using a running stitch.

Now the fun part — gently pull your thread tight , and your mushroom cap should slowly take form…

Slip the assembled mushroom inside the gathered brown felt, placing the mushroom cap on top of the assembled mushroom like a hat. Continue to tighten the brown thread until the mushroom cap hugs evenly around all sides of the mushroom top.

Tie a tight knot and hide the tail of your thread inside. Nice work! Now make a few more, and watch your own garden start to grow. (@⌒ー⌒@)

In the spirit of sharing and caring, please don’t use this pattern for profit, and give credit to the book’s author when credit is due (前田 智美). Thanks! 

Look at my garden grow

I hesitate a bit to tell you how much time I’ve spent thinking about these vegetables this week. Because it makes me seem a little insane.

School has started up again, and all I can think about in class is how much I want to go home and sew my veggies. They’ve possessed me.

I think it is because they are incredibly satisfying to make — quick, easy, and in the end, totally adorable. Who thought a carrot could be so cute? I never did. I don’t even enjoying eating carrots (because I am still a 5 year old and pick them out of things), but sewing carrots is another story.

I made all of these veggies using this craft book I bought a few months ago, which has been sitting on my desk, begging me to open it. Laughing at me. Taunting me. “Look at how cute my fruits are!” it says to me in the middle of the night.

The title of this craft mook (regularly produced, somewhat cheap paperback books) translates to “Full of cute vegetables and fruits,” which is the absolute truth. It also promises that you can make everything inside using 20 sq.centimeter squares of felt, which are widely available around Tokyo.

The result is that some veggies turn out quite small, which was a challenge for my clumsy fingers.

Let’s take a look inside:

The headings and project titles are in English, but all of the instructions are in Japanese. I find I like this, actually — I can read enough to get a general sense of what to do, but also forces me to do a bit of problem solving to make up for the Japanese that I can’t quite understand.

Each vegetable is represented in a full color photo spread in the front of the book, and in the back of the book additional assembly instructions guide you through the project. Patterns are printed on an additional sheet, which you tear out of the back cover.

I think they stretched the definition of fruits a bit by including these cakes, but who can complain once they see how happy they make this bear.

More photos can be found on Flickr. Have you made anything out of felt recently? Do share!

Badge of Honor

I’d like to share my new favorite craft book.

embroidery emblem. It’s a small book with gorgeous photography. I’ve spent far more time looking through the pages of this lovely book than actually crafting the projects in it. I love the style. No wildflowers or calico cats here, my friends.

Though this jellyfish is totally rad, I’ve become enamored with the monogrammed emblems. I love the idea of wearing a personalized badge. Mine will say A — maybe for Angela, maybe for Awesome. Or Awkward. It’s hard to tell.

First, the photo spread:

Then a pattern and stitch guide:

Most of the patterns are a little advanced, with stitches I’ve never tried before. But even so, I managed to poke out a few gifts for friends. Here are the fan photos they sent me:

These were fun to make and easy to customize. It didn’t take me long to go off pattern…

I think I’ll wear my heart [badge] on my sleeve.

A Stylish and Cute Craft Book

If you would have told me a few years ago that after moving to Tokyo I would be ooh-ing and ah-ing craft books dedicated to ribbons and pink bows, I would have laughed in your face.

Only the bows knows who’s laughing now.

I even made a mega bow. I’m not sure what head of hair is ready for this.

This craft book is adorable, full of easy accessory projects to make in under an hour.

I love the brooches and badges. If I wore one of these, I would feel like a winner all day.

I’m not sure what to try first — the bow necklace or the hairy shoulders.

The illustrated step-by-step instructions are really easy to follow, and the assembly techniques heavily favor a hot glue gun. It’s like I’m an 11 year old again!

And get ready for this … scrunchies are making a comeback! A J-pop band even sings a song about them (ponytail to shu shu) though due to gratuitous beach and wet t-shirt scenes, I’ve decided not to link to the music video. Do the work yourself.